


Step By Step Guide to Trim Videos on iPhone
Trimming videos on an iPhone is as easy as pie. You just have to follow a few simple steps mentioned below:
Step 1: Open the video you want to trim from the Photos app.
Step 2: Click on the “Edit” button from the bottom. You can also find the “Edit” button at the upper right-hand side of your screen.
Step 3: Next, you’ll get a video timeline underneath your video. Move the sliders from both ends as per your choice.
Step 4: Once done, hit the “⏵” button to check if the video hits the mark.
Step 5: Tap “Done” and choose “Save video as a new clip.” You’ll find the trimmed clip in your Photos app.
It’s as simple as that! Now, share the trimmed video wherever you want.
%252012.png)
Trim Your Videos on iPhone with BIGVU
No doubt, trimming videos directly in the Photos app is simple. But BIGVU can make the process even simpler with its AI-powered video trimmer. Meaning, unlike that confusing timeline where you need to precisely drag the bar, you can easily do it with words.
Want to know how?
Follow the step-by-step guide:
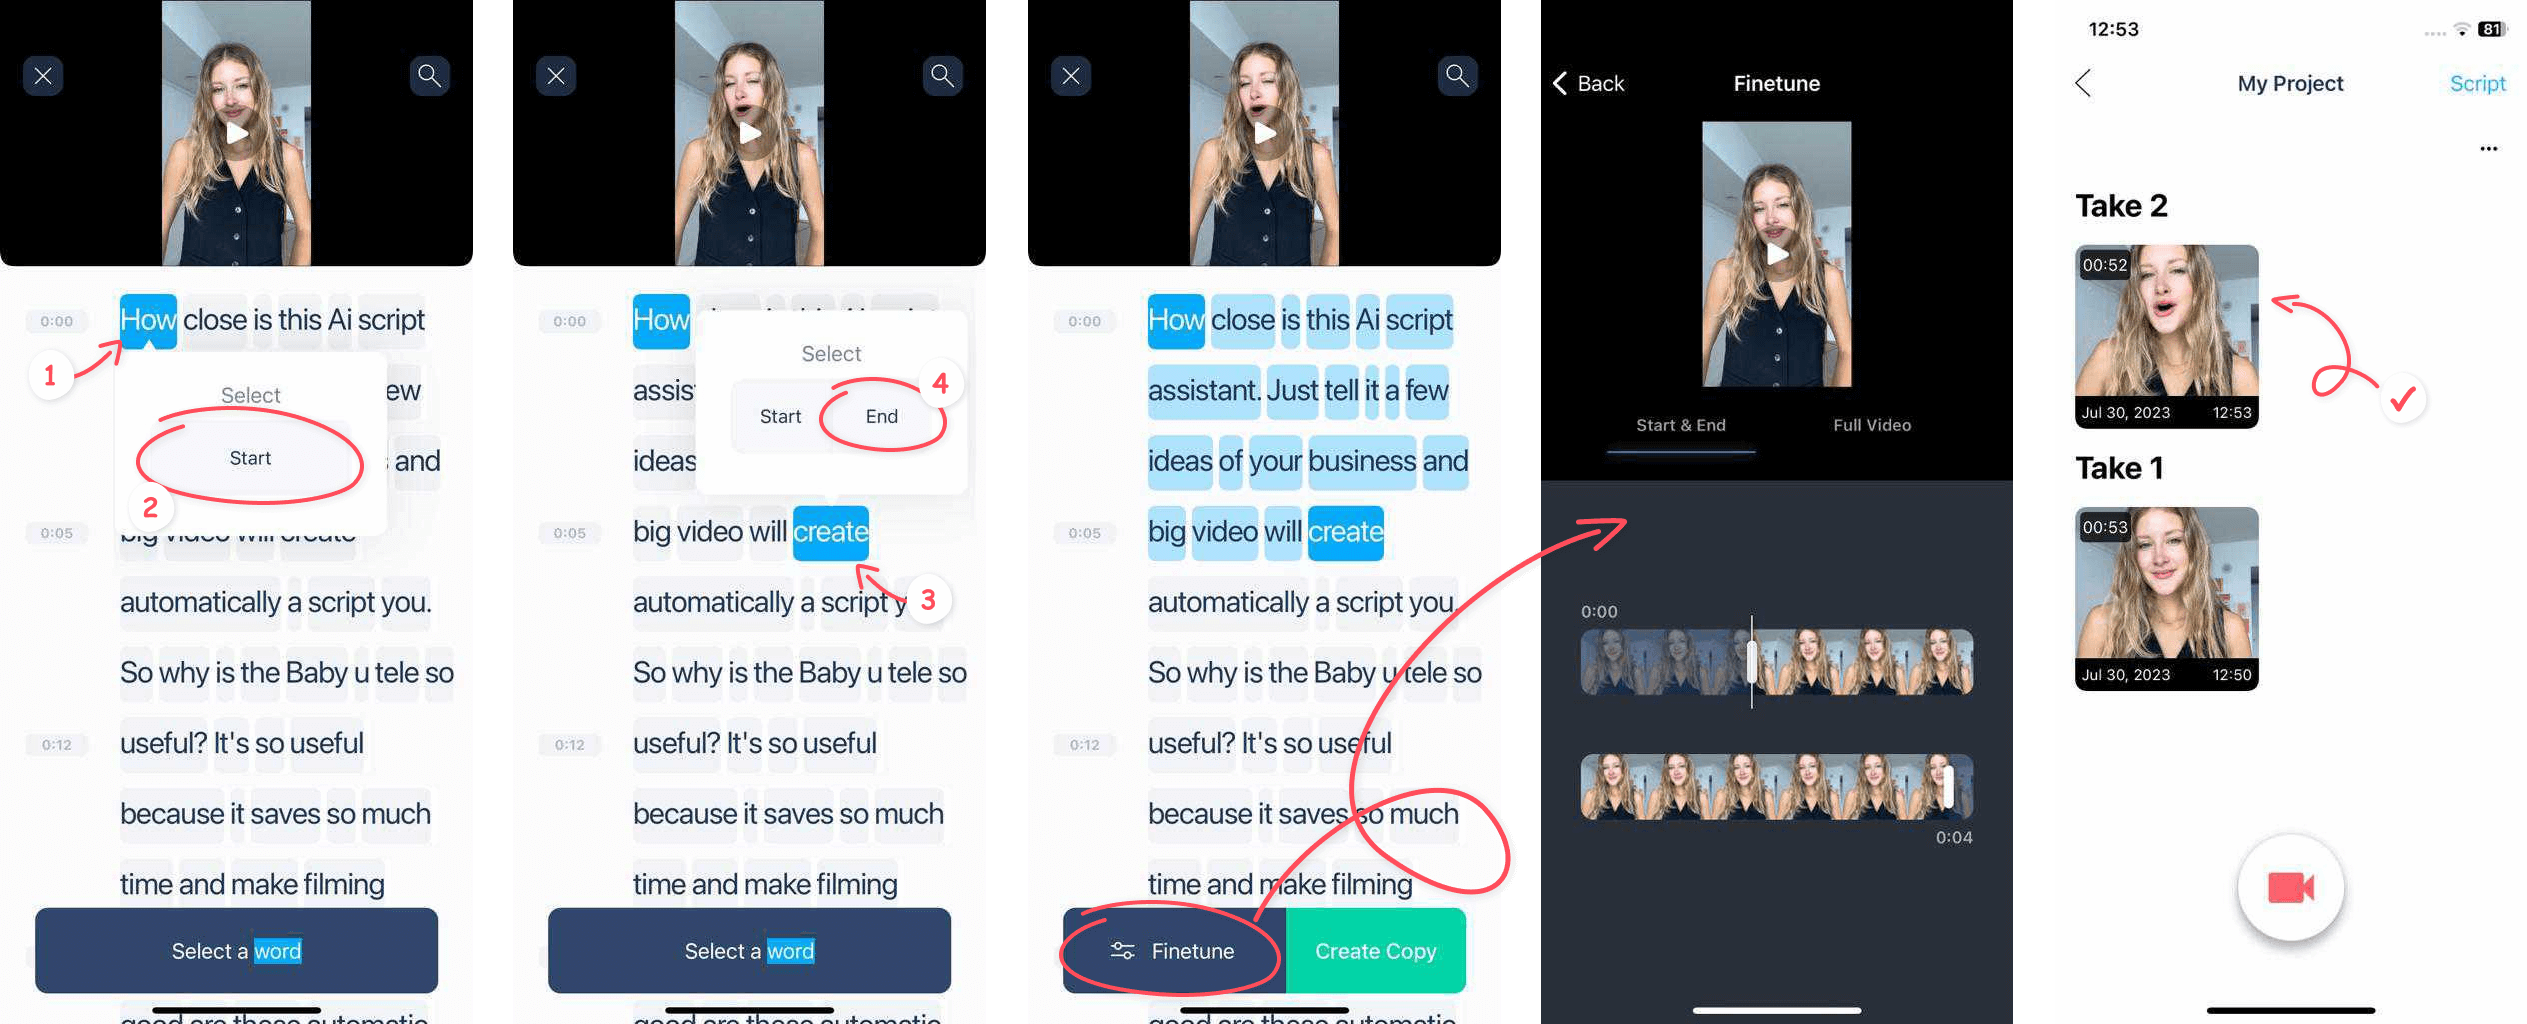
Step 1: Install the BIGVU app on your iPhone and finish the one-step sign-up process.
Step 2: Click on the "+" icon from the bottom of your screen.
Step 3: Next, tap on " Import Video." It'll redirect you to your files, and then you have to select the video you want to trim.
Step 4: Click the "Trim Video" option.
Step 5: After that, a long list of languages will appear on your screen. Select the language in which you want to transcribe the video. Then, hit "Done." It’ll take a few minutes to process the transcription.

Step 6: Select the word you want to start the video with, and then select the last word you want to end the video with. It’ll automatically trim your video.
Step 7: Once done, two options will appear - Finetune and Create copy. Hit the “Create copy” button if the trimmed clip is perfect.
But, if you see the transcription isn’t accurate (which rarely happens), tap on the “Finetune” button. It’ll redirect you to a page where you can manually trim the video by moving the sliders. Finally, hit the “Create copy” button.
How to Trim/Cut the Middle Parts of a Video on an iPhone
Want to cut those unwanted fumbling, sneezing, or awkward silence from your video?
You can easily do it with iMovie. Just follow the below-mentioned step-by-step guide:
Step 1: Open the iMovie app on your phone and select the video you want to cut the clip from. The video will appear on your screen with the timeline and a playhead (the vertical white line.)
Step 2: Next, scroll through the timeline till the first scene of the portion you want to cut. Once done, tap the playhead and hit “Split” at the bottom of the screen. It’ll divide the video into two parts.
Step 3: Again, scroll through the last scene of the clip you want cut and then split.
Step 4: The part you want to remove is now separated from the video. Now, select the clip by tapping on it and then hit “Delete.”
Step 5: Click “Done” to save the whole video without the unwanted clip. Later you can upload the video to your gallery.
Yayy! You have successfully cut out that clip from your video.
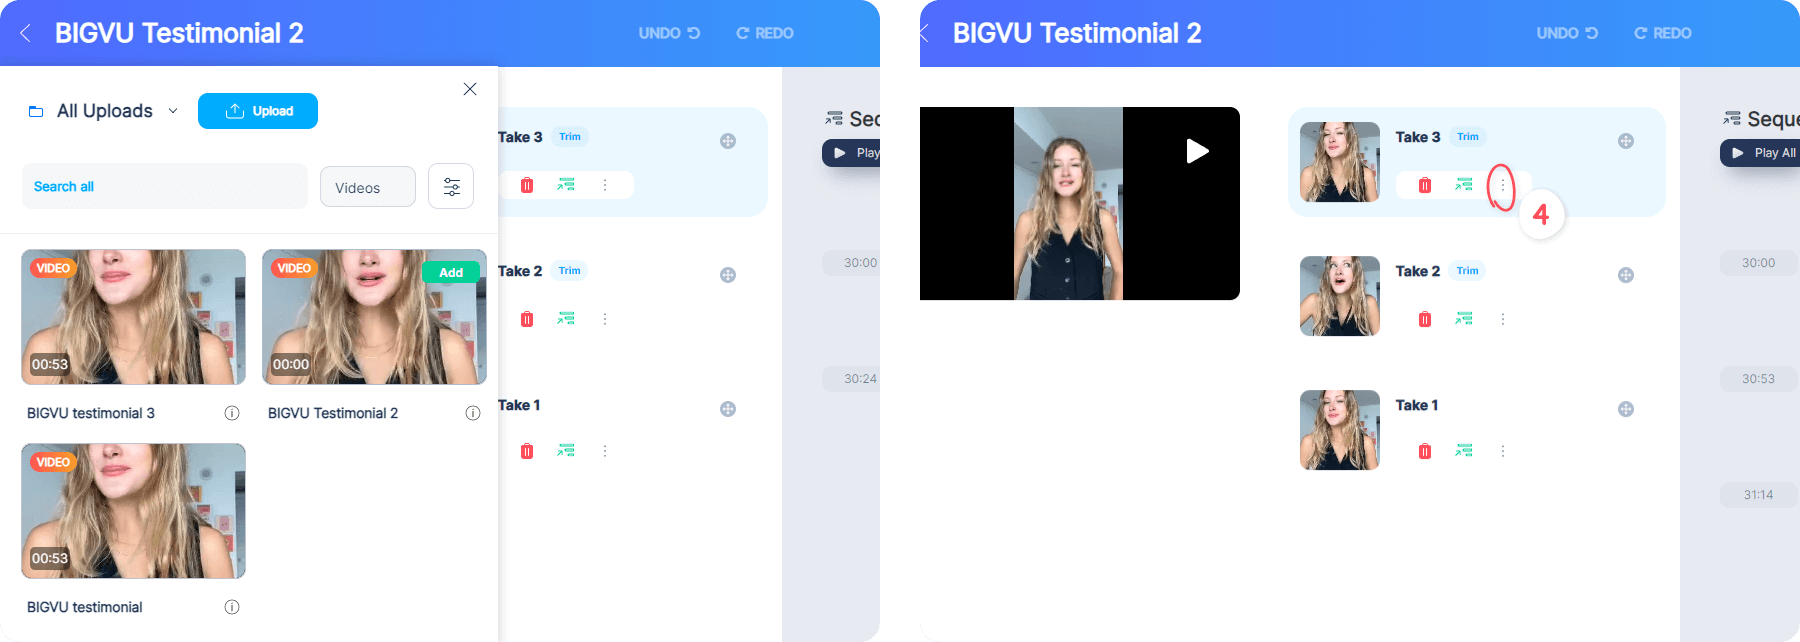
Another way to Cut Trim the middle part of an iPhone video
Sure, iMovie can help you cut/trim the middle part of an iPhone, but you can do it more precisely with the BIGVU sequencer. All you have to do is to follow some simple steps:
Step 1: Transfer the video to your desktop and upload it on BIGVU’s dashboard.
Step 2: Click on the “three dots” under the video you want to trim and then click “Edit."
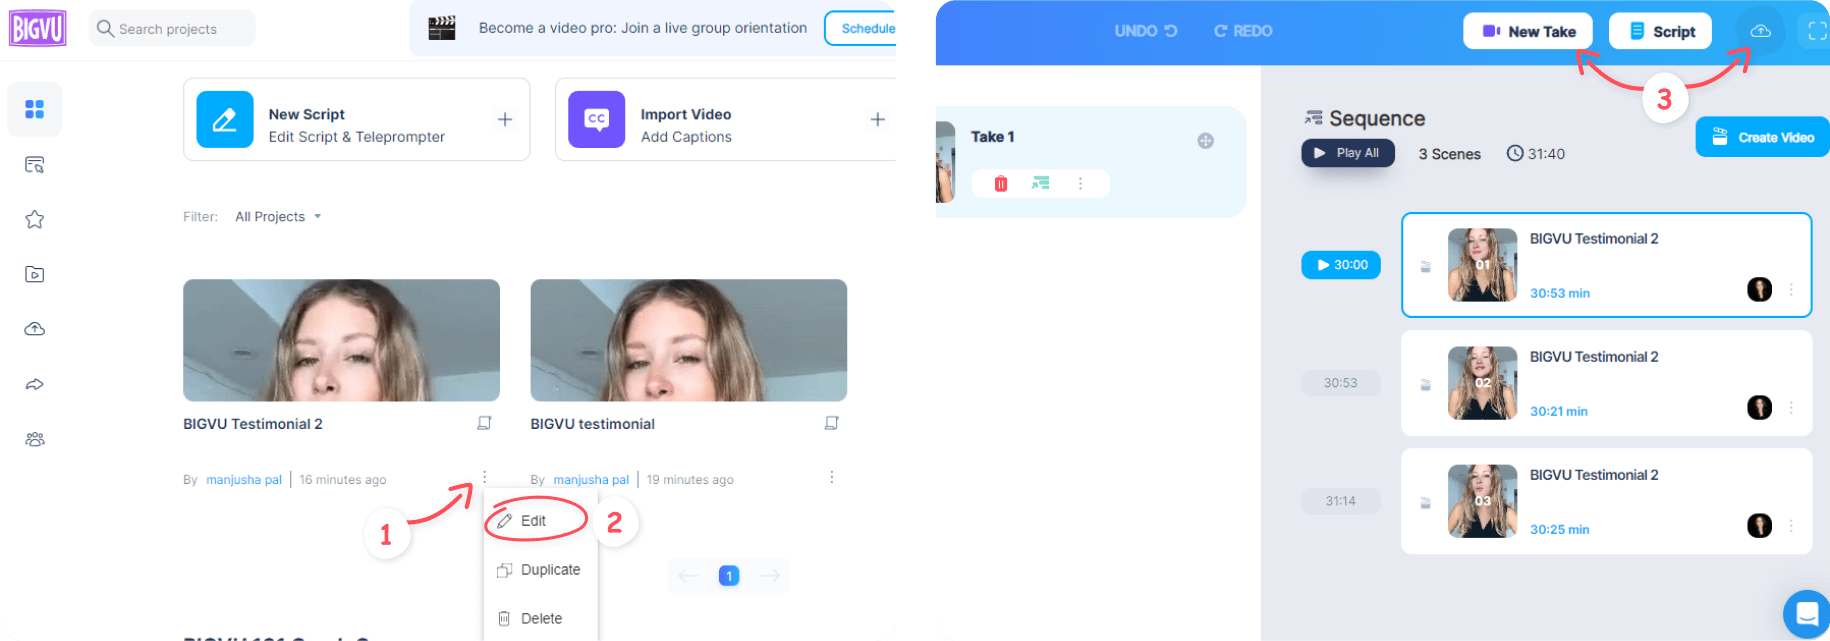
Step 3: You’ll find the video on another interface, and again, you have to tap on the “three dots” under the video.
Step 4: Click on “Trim video.”
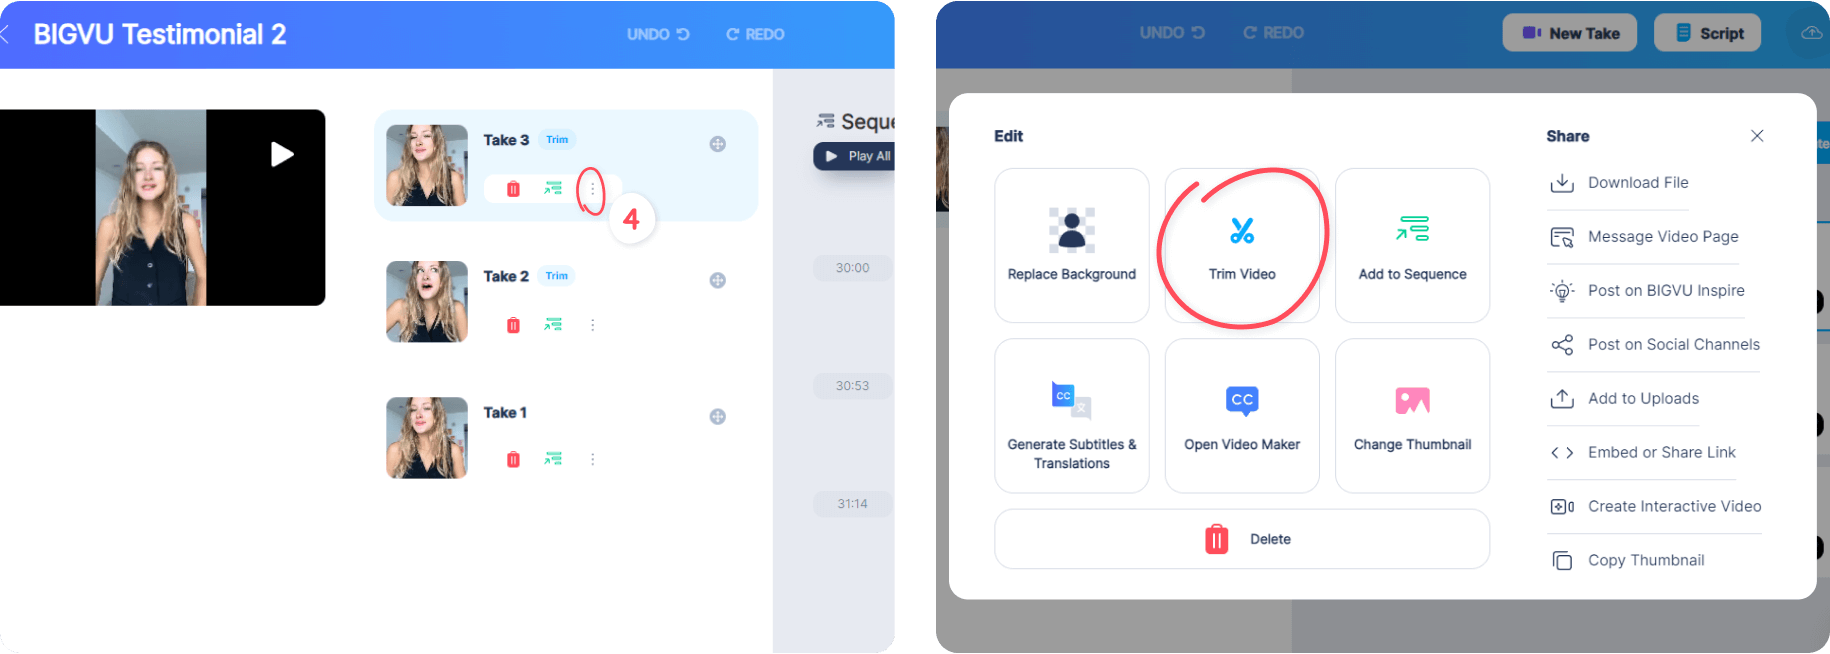
Step 5: Drag the timeline till the first scene of the clip you want to remove and hit “save.” It’ll be saved as “Take 2”.
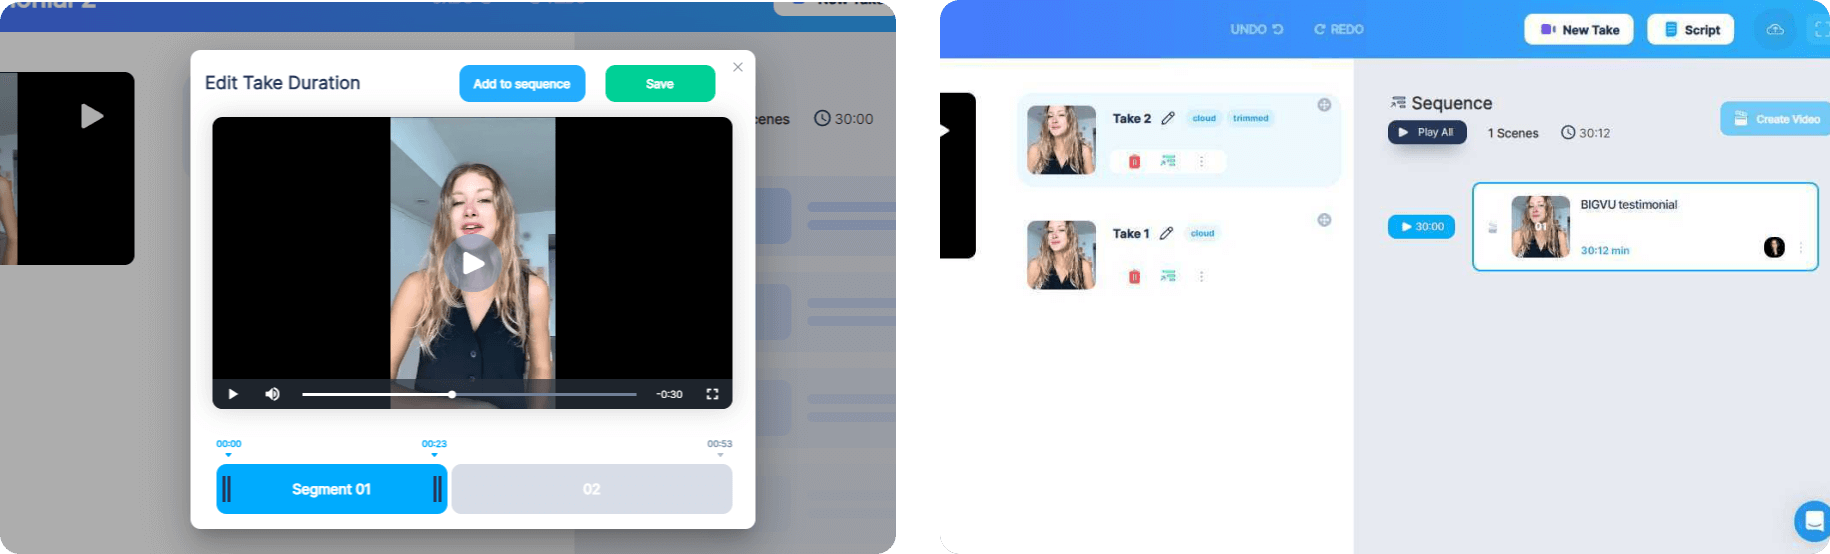
Step 6: Again, click on the three dots under the very first video and click “trim.” This time, slide the first bar till the end of the scene you want to cut and then hit “save.” The new one will be saved as “Take 3”.
Step 7: Add the “Take 2” and “Take 3” to the sequence by clicking on the “three dots” and lastly, click on the “Create video” option.
The new video will be saved on your project page, and you can share it on your socials or transfer it to your iPhone.
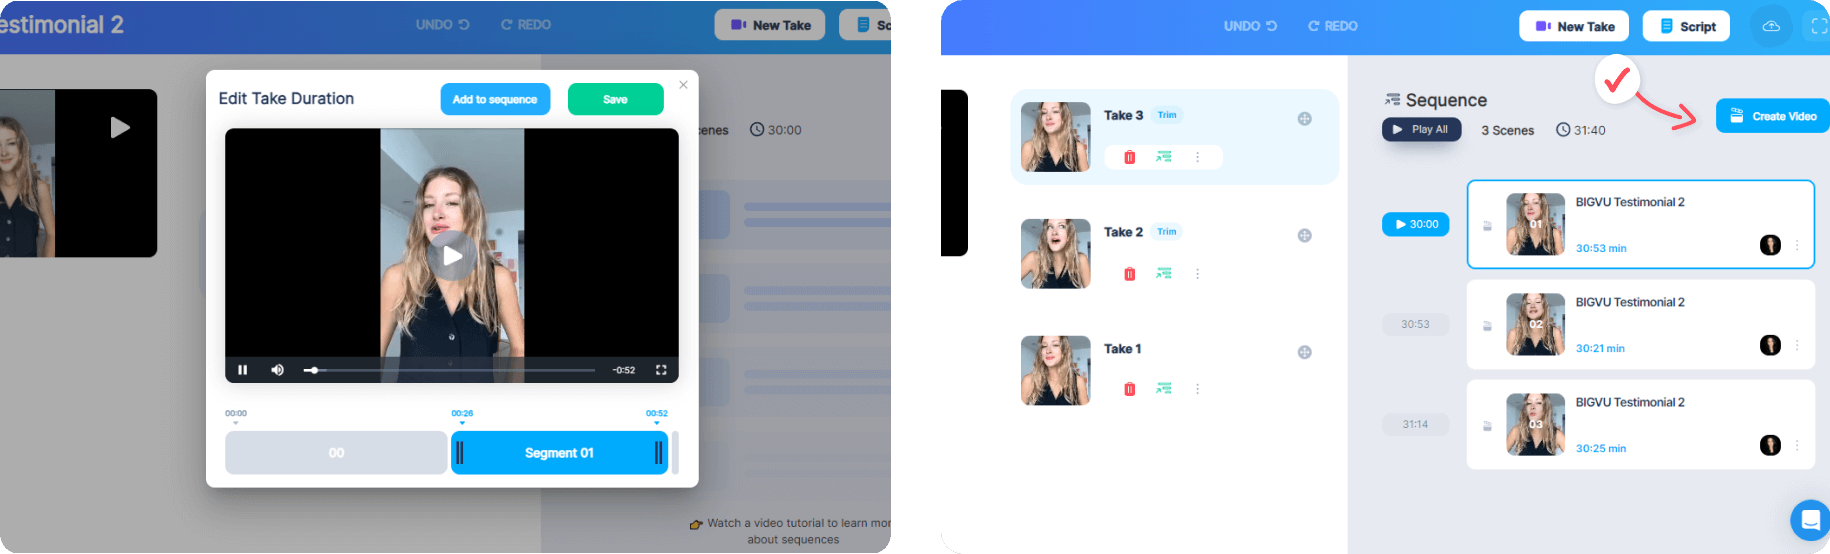
How to Merge/Rearrange Different Video Clips Using BIGVU
Most creators love to shoot multiple takes of a video one by one instead of shooting the whole video at a time. And then, they add their favorite takes to the main video to make it perfect. So, if you are one of them, BIGVU’s web sequencer will be a great help. In fact, if you want to rearrange the video clips to make the ultimate video more cohesive, you can also use this sequencer.
Keep an eye on these steps to know the process:
Step 1: First things first, open your “Project page” and click on the “three dots” under the clip that you want to add to your video.
Step 2: Hit “Edit.”
Step 3: Next, you’ll get redirected to another page where you will get the video clip as “Take 1”.
Step 4: Click on the “New Take” button if you want to shoot videos directly from the browser. Either way, hit the “upload” button if you have pre-recorded video clips.
Step 5: Next, click on “three dots” in each video clip to make changes like trimming, background replacing, or generating subtitles and thumbnails, etc.
If you have nothing to change, simply click the “Add to Sequence” option to rearrange them.
Step 6: Now, if their sequence is right, simply click on the “Create video” option. If not, drag the clips to relocate them to their right position. Once done, click on the “Play All” button to check everything is fine. Then, hit “Create Video.”

The video will be saved on your project page.
How to Add Extra Video Clips Within Your Video
Let’s say you’re an influencer and creating a promotional video for a brand. But when you submitted the video for final review, that brand suggested you to add some extra information within the video. Now what would you do? Would you again create the video from scratch or just film another clip on your phone and add it to the video?
The second option is easier and will save a huge chunk of your time. And if you rely on BIGVU for the same, you have to spend just one minute on this process. Let’s see how:
Step 1: Visit your Project Page and click on the three dots under the video where you want to add that clip.
Step 2: Next, click on the “Edit” option. It’ll redirect you to another interface.
Step 3: Again, click on the “three dots” and then select the “Trim Video” option.
Step 4: Cut the video to the part where you’ll have to add the extra clip. Then, save it.
Step 6: Remember the timeline where the trimmed clip ended; now trim the rest of the part from that timeline. Again, click “save.”
Step 7: Add both clips to the sequence.
Step 8: Click the “Upload” option (on the upper right-hand sight of the screen) and upload that extra video clip. It’ll automatically be added to the sequence.
Step 9: Adjust their position and hit the “Create Video” option to make them a single cohesive video.
Here you go! 🤩 This way, you can split your video into parts and add additional video clips wherever you want.
And That’s It!
As you saw, trimming videos on an iPhone doesn’t take much time. In fact, the Photos app will also provide you with some beginner-level editing tools like cropping, changing effects, and so on. Hence, if you’re looking for some simple changes in your video, you don’t need to rely on any other third-party tool.
But, if you need some advanced video editing features like transcription, adding subtitles, online teleprompter, and scriptwriting, BIGVU is for you. Oh, did I inform you that you don’t need much video-editing knowledge to navigate this platform? Yes, if you are just starting and have zero knowledge about video editing, BIGVU has your back. The app will guide you throughout the editing process.
So, download the BIGVU app today to edit videos like a pro!